Rebuilding an iBook G3 Clamshell Battery Pack
The goal
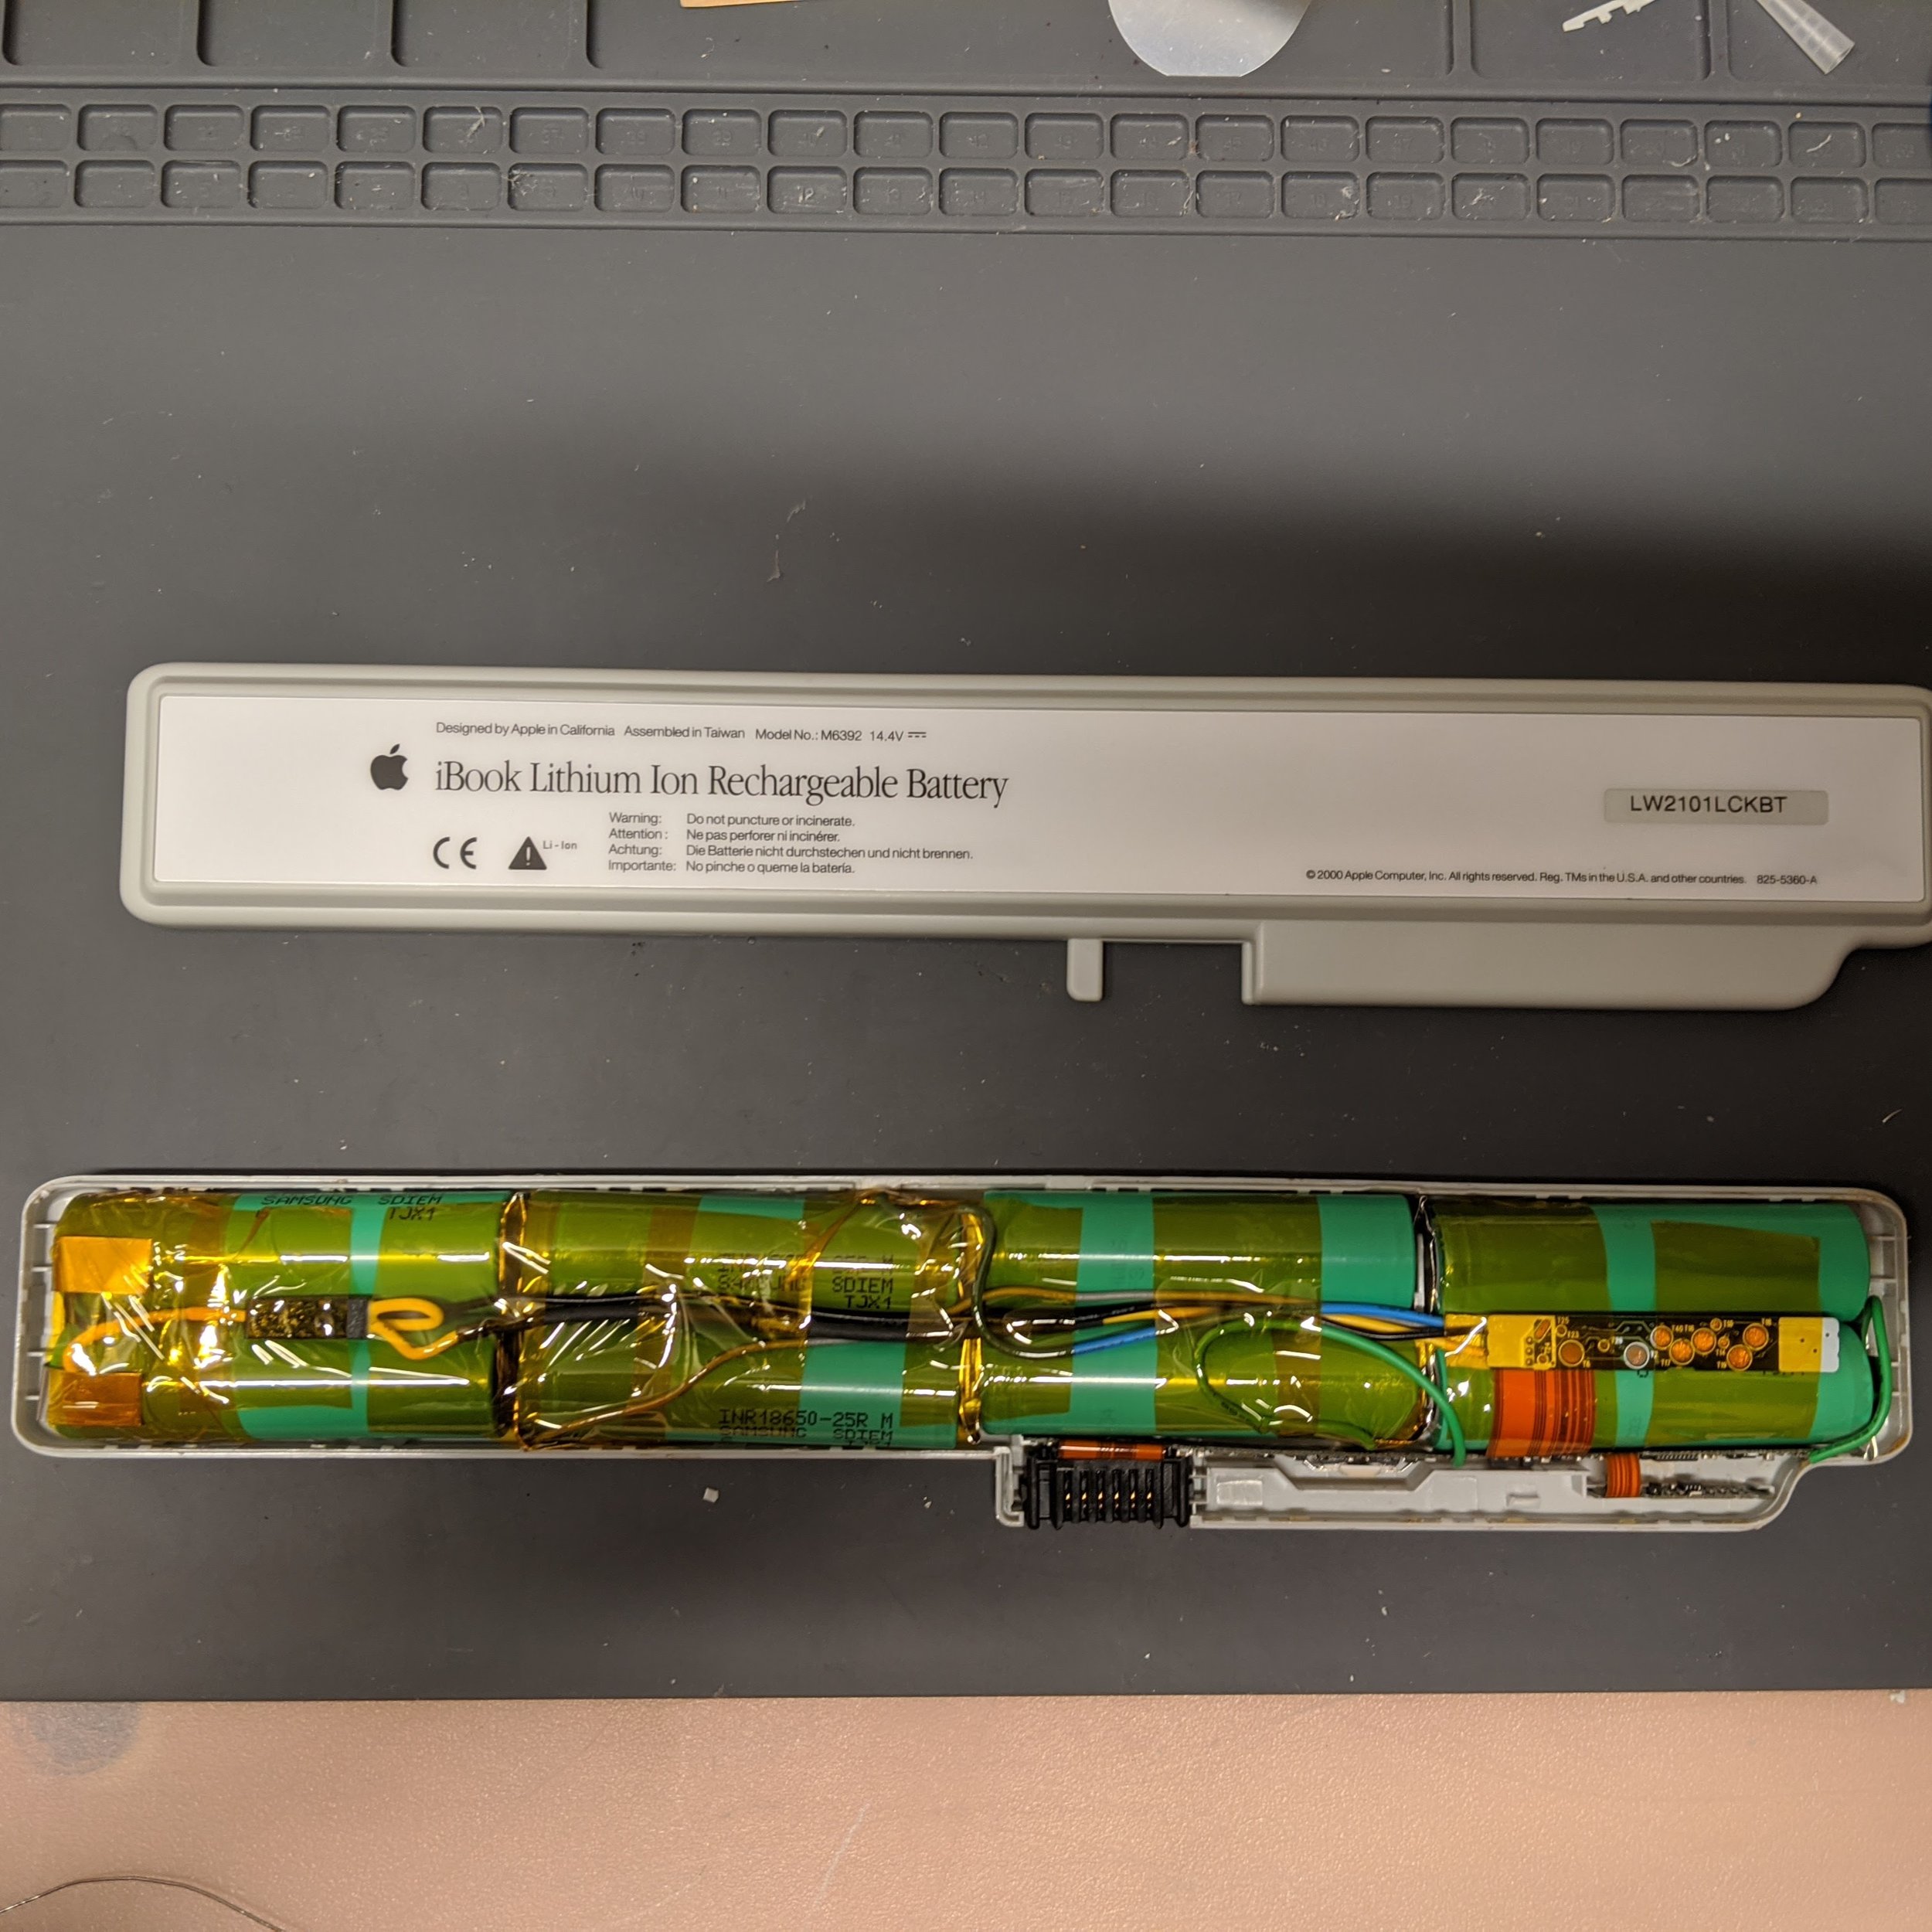
I have an Apple iBook G3 (1999) with a battery that no longer functions. As I want to continue using this computer without being tethered to an electrical outlet, I decided to try repairing the existing battery.

Taking apart the laptop battery was not an easy job. Not only was the battery held together with plastic clips, but these clips were also glued. I used a variety of plastic pry tools, especially some old gift cards to pry the casing open. It was important to be very careful, as if I were to damage the battery pack, I wouldn’t be able to get it back together again.

The Electronics
After cracking open the plastic housing of the battery pack, I discovered eight 18650 Lithium-Ion battery cells, all of which had long ago leaked and rusted. A multimeter confirmed they held no charge. The control circuitry was also covered with minimal corrosion, which I cleaned up using isopropyl alcohol.

As a laptop battery is comprised of several smaller batteries connected to a “smart” control module, to make this repair, I decided to replace the expired battery cells with new ones and keep the existing control PCB.
A word of caution: 18650 battery cells hold a lot of energy and are not very friendly or safe to work with.
I carefully drew a diagram showing how the original batteries were wired together before cutting them apart from the nickel strips welded to their terminals.
While the original battery cells did not pose much of a hazard as they hadn’t held a charge in years, new 18650 batteries would be somewhat dangerous to work with, so I had to spend a considerable amount of time reading about proper safety procedures.
If I were to accidentally bridge the wrong electrical connection, I could start a powerful chemical fire and become seriously injured. Additionally, there was a lot of conflicting information online about working with this kind of battery pack. I decided to err on the side of caution and wear heavy welding gloves and safety goggles when handling the new 18650 cells I purchased.
PSA: If you don’t have extensive 18650 battery safety knowledge, please do not attempt to work with them! They can be dangerous if they are not handled with extreme care.
Spot Welding
The new 18650 battery cells needed to be connected to the existing wiring of the battery pack. While it is technically possible to solder directly to the metal battery terminals, this is a very bad idea for safety reasons —not only does solder stick poorly to the battery housing, but using a soldering iron to heat up the batteries for a prolonged period of time could cause them to catch on fire or short circuit.
A much better way to connect the batteries together is to use spot welds. This delivers much less heat into the battery and results in a stronger bond. As I didn’t have a spot welder already, I decided to build one to do things as safely as possible. My spot welder was fashioned from a lawnmower battery, an ATV starter relay, and, an arcade button, and some very thick pieces of copper wire. It functions by passing a very high amount of electrical current through a small area, causing the metal to heat up and melt together. My first tests with the spot welder resulted in a shower of sparks, and some very poor-quality welds. Eventually, I got better with my technique and was able to make fairly high-quality spot welds.
Despite successfully welding 18650 battery cells, I believe building my own spot welder was a bad idea for both safety and weld quality reasons, so I wouldn’t do things this way again. There are commercial products meant to weld battery cells together safely and consistently, so it would have been better to just buy the right product instead of trying to make my own machine for less money. Of course, this was still a good learning experience.
Results
After spot-welding the batteries together and soldering wires to the control PCB, I tried placing the assembly back into its plastic housing. Unfortunately, no matter what I tried, I couldn’t get the cells to fit! The degree of precision required to get things to fit was greater than what I had managed to achieve.**
Around this time, something went wrong: The plastic casing of the battery housing pinched a wire as I was trying to snap it together. This damaged the insulation of the wire and allowed it to short-circuit. Before I knew it, I could see the nickel strip inside the casing glowing red hot! Thankfully, nothing caught fire, as the nickel strip melted in such a way that it acted as a sort of thermal fuse and prevented anything terrible from happening.
After realizing how close I had come to accidentally starting a potentially serious fire, I decided it would be best to halt this project in the name of safety. I took extraordinary caution to disassemble and dispose of the partially melted 18650 cells before shelving the remaining electronics.
While I believe it is likely that my rebuilt battery pack was electrically sound (the issue being with the sharp plastic casing), for me, taking another risk with safety was not worth it to use my laptop cordlessly.
Some ideas for the future
I think that a better (and much safer) solution will be to make a custom USB-C PD adapter cable for this laptop and run it off of a portable battery bank instead of trying to reuse its original battery. For now, though, I am content with using a standard AC charger cord.
I made a USB-C PD adapter cable for this iBook several months ago, and it has been working perfectly ever since. I connected a USB-C PD trigger dongle (20V 5.5x2.5mm barrel jack) to another adapter designed to go between the barrel jack and the iBook charger port. For power, I used a standard 65-watt USB-C power supply, which seemed to be perfectly adequate.
Update 12/24/2024: I recently saw a post on the 68kMLA forum that should make this job a lot easier. Rather than spot-welding a new battery pack together, the general idea is to buy an existing PC battery pack with eight 18650 cells already arranged in the same configuration. Then you can simply transplant the battery guts into an iBook battery pack, swapping the generic circuit board for the iBook battery’s board.
Update 8/19/2025: If you are attempting a similar project, I highly recommend reading the blog post at the following website. There is some great information there that isn’t easily found elsewhere. Many things have changed since I attempted this project five years ago, in particular, it seems the quality of inexpensive spot welders has improved. https://blog.lazd.net/rebuilding-an-ibook-g3-clamshell-battery.html
Final thoughts
**The spacing of the batteries on the nickel strip needs to be incredibly precise for this to work. For anyone attempting something similar, I believe a possible workaround would be to use four battery cells instead of the original eight cells. This would leave more space for wires and be more forgiving of imprecision. Additionally, 18650 batteries are made with greater capacity now than they were many years ago, so the total capacity of the battery pack in milliamp hours might not be too significantly compromised.
Before starting this project, I had done significant research into rebuilding laptop batteries, but after reviewing the same material after I was done with the procedure, I noticed that none of the sources I could find specifically showed the Clamshell battery’s plastic case neatly snapping back together as I struggled to achieve. In fact, some of the sources showed the exact same difficulties with the casing failing to close.